Common behavioral questions in job interviews
2020-04-26REINFORCE Algorithm explained in Policy-Gradient based methods with Python Code
2021-03-01In this post, I’m gonna describe the steps I used to utilize GPU for the PyTorch Deep Learning framework on my laptop.
Setup GPU on Ubuntu 16.04 (2020-11)
The following steps were performed on Ubuntu 16.04. I provided a post update corresponding to these steps for set upping GPU on Ubuntu 20.4 in the update section.
Generally, you should check the compatibility of several things:
- Pytorch Version
- Nvidia Driver
- Cuda Version
My python version is 3.7, you can create a conda env by the following command:
conda create -n deep_env python=3.7
First Step: Check compatibilities
Check Cuda and Nvidia GPU drivers compatibility at:
https://docs.nvidia.com/deploy/cuda-compatibility/index.html
Here is the important table:
| CUDA Toolkit | Linux x86_64 Driver Version |
| CUDA 11.1 (11.1.0) | >= 450.80.02 |
| CUDA 11.0 (11.0.3) | >= 450.36.06 |
| CUDA 10.2 (10.2.89) | >= 440.33 |
| CUDA 10.1 (10.1.105) | >= 418.39 |
| CUDA 10.0 (10.0.130) | >= 410.48 |
| CUDA 9.2 (9.2.88) | >= 396.26 |
| CUDA 9.1 (9.1.85) | >= 390.46 |
| CUDA 9.0 (9.0.76) | >= 384.81 |
| CUDA 8.0 (8.0.61 GA2) | >= 375.26 |
| CUDA 8.0 (8.0.44) | >= 367.48 |
| CUDA 7.5 (7.5.16) | >= 352.31 |
| CUDA 7.0 (7.0.28) | >= 346.46 |
Check PyTorch compatibility at:
https://pytorch.org/get-started/previous-versions/
Based on my system configuration I decided to install the following versions:
CUDA: 10.1
GPU Driver: 418.56
Pytorch: 1.6.0 / Torchvision: 0.7.0
Second Step: Install GPU Driver
Install the appropriate version of your GPU using one of the following options:
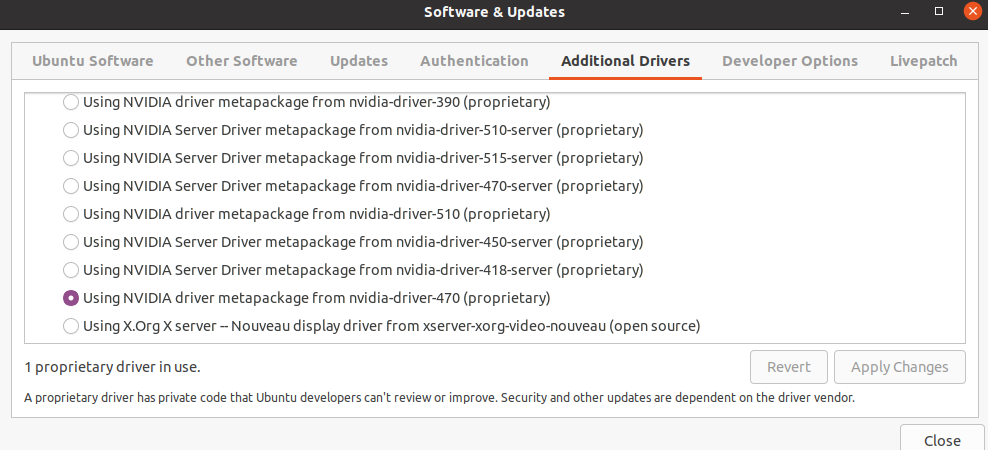
- Go to Software & Update -> Additional Drivers -> Using Nvidia binary driver – version X.X.
- Or if you can’t see the first option run the following command:
sudo apt install nvidia-418 - Or alternatively, you can download drivers from the Official Nvidia website.
- Reboot your system
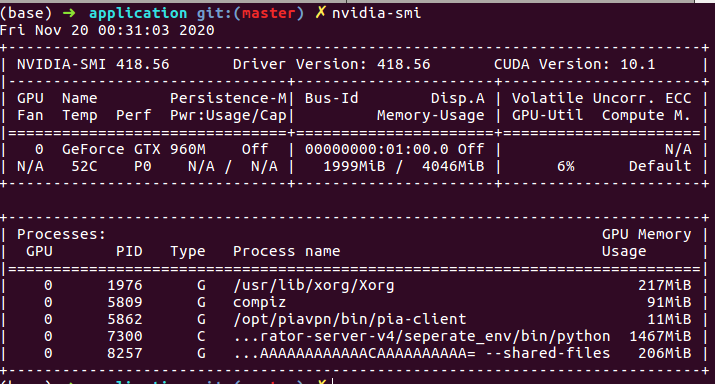
- Now run the command
nvidia-smi. It must show something like the following:
Third Step: Install Cuda Toolkit
Download and install the proper Cuda Tool kit version from https://developer.nvidia.com/cuda-toolkit-archive and then reboot. Specifically, I downloaded CUDA 10.1 Toolkit from this link and installed the .run file by:
sudo sh cuda_10.1.105_418.39_linux.run
Final Step: Install PyTorch
Install the appropriate Pytorch version from:
https://pytorch.org/get-started/previous-versions/
I have installed it using the following command:
pip install torch==1.6.0+cu101 torchvision==0.7.0+cu101 -f https://download.pytorch.org/whl/torch_stable.html
Update for Ubuntu 20.04 (2022-08)
I have recently migrated from Ubuntu 16.4 to Ubuntu 20.04. So I had to change the configurations for my GPU setup.
First Step: Check compatibilities
Here is the new configuration that worked for me:
CUDA: 11.4
GPU Driver: 470
Pytorch: 1.11.0+cu113/ Torchvision: 0.12.0+cu113
Second Step: Install GPU Driver
Select the compatible NVIDIA driver from Additional Drivers and then reboot your system.
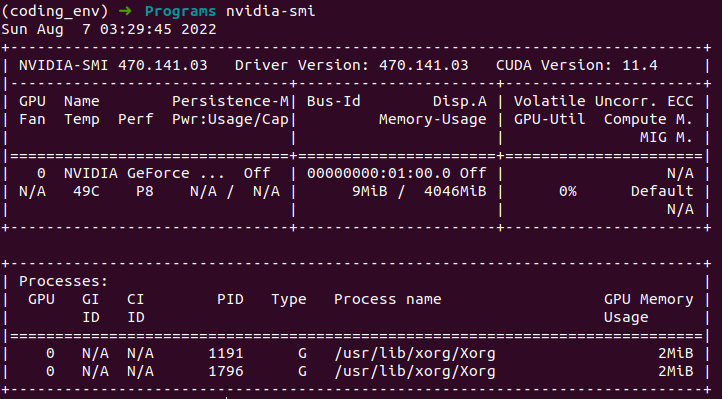
Now run the command nvidia-smi. It must show something like the following:
Third Step: Install Cuda Toolkit
Downloaded CUDA 11.4 Toolkit from the Official NVIDIA Website and then install the .run file by running the following command:
sudo sh cuda_11.4.4_470.82.01_linux.run
Final Step: Install PyTorch
pip install torch==1.11.0+cu113 torchvision==0.12.0+cu113 torchaudio==0.11.0 --extra-index-url https://download.pytorch.org/whl/cu113
Checking PyTorch is using GPU
If everything is fine you should see the following outputs when running the Python script below:
>>> import torch

>>> torch.cuda.is_available()
True

>>> torch.cuda.device_count()
1

>>> torch.cuda.current_device()
0

>>> torch.cuda.device(0)
<torch.cuda.device at 0x7efce0b03be0>

>>> torch.cuda.get_device_name(0)
'GeForce GTX 960M'
Enjoy GPU Power!